Your measurements and garment fit profile explained
After your HeraVita body scan, a detailed profile is generated in your HeraVita account on the HeraVita website. This article explains what each measurement and fit metric means, how it is derived, and what it can tell you about how clothes are likely to fit your body.
What the scanner captures
The HeraVita body scan uses non-contact 3D optical scanning technology to capture the surface geometry of your body. In a single session of a few seconds, the scanner records over 250 individual measurements - circumferences, lengths, widths, and proportions - without physical contact and without any ionising radiation. Your age, weight, and height are entered by you via your HeraVita account at the appointment, using a body measurement station provided in the private scan room, and are combined with the optical scan data to calculate the full range of metrics in your profile.
These measurements fall into two distinct sections of your profile. Detailed Measurements gives you the raw data: the key actual dimensions of your body, expressed in centimetres or inches. Garment & Fit translates those dimensions into practical sizing outputs - the numbers and categories that correspond to how clothes are labelled and sized in Australia.

Both sections are visible in your HeraVita profile. Your profile is linked to your HeraVita account and is accessible only to you when you log in. For research purposes, your data is used in de-identified and aggregate form. Individual participants are not identifiable in any research outputs.
Standardised sizing was never built from real bodies. Your profile is.
Detailed measurements
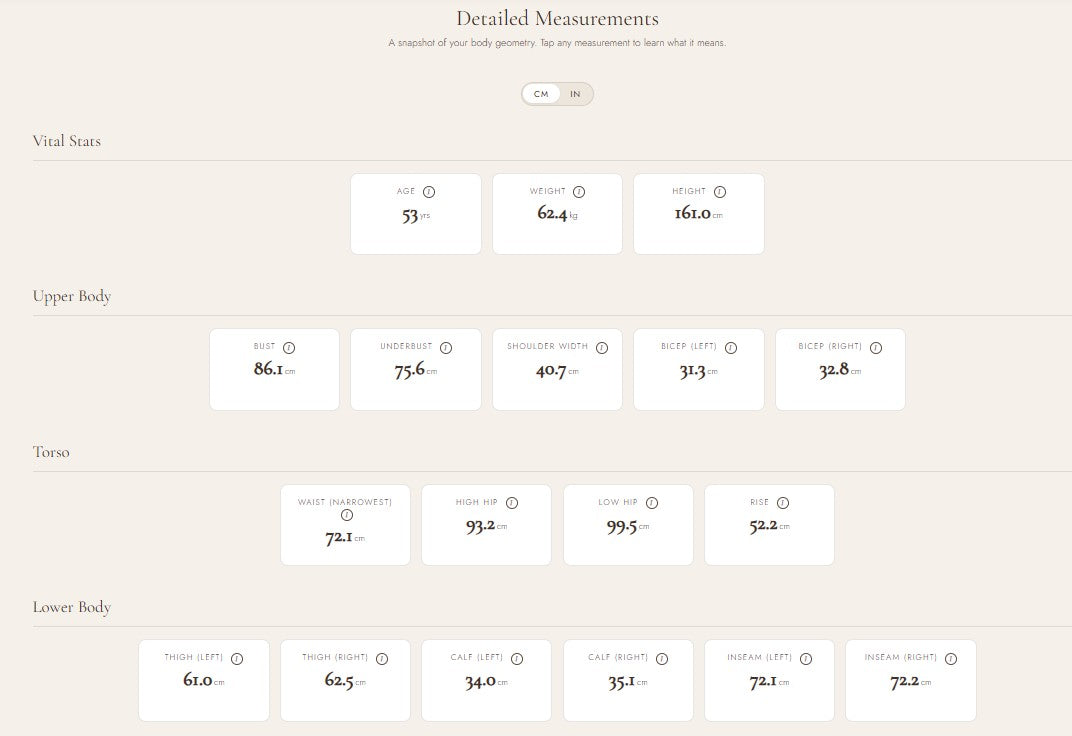
Your detailed measurements are grouped into three sections: Vital Stats, Upper Body, and Lower Body. Each measurement is accompanied by a brief explanation accessible via the information icon in your profile. What follows is a more complete account of what each measurement represents and why it is captured.

Vital Stats
Entered by the participant via their HeraVita account at the appointment. Age is used as a reference variable in several calculated metrics across both your measurements and wellness profiles, including reference ranges for body composition and bone health indicators. The age recorded is your age at the time of the scan - if you return for a subsequent scan, your updated age will be entered at that appointment and reflected in the recalculated metrics.
Entered by the participant via their HeraVita account at the appointment, measured using a body measurement station in the private scan room. Weight is used in conjunction with 3D scan data to calculate body composition metrics including body fat percentage and lean body mass. Because weight is entered rather than optically derived, using the scale provided at the appointment ensures consistency across calculated metrics.
Entered by the participant via their HeraVita account at the appointment, measured using a body measurement station in the private scan room. Height is foundational to proportion calculations across the profile - including inseam-to-height ratios used in jeans sizing - and is used in body composition formulas. Entering an accurate height at the appointment is important: even a small discrepancy will affect calculated metrics across both the measurements and wellness sections of your profile.
Upper Body
The circumference of the fullest part of the chest, measured across the nipple line. The primary measurement used for top sizing, bra cup estimation, and dress fit across the chest. Distinct from the underbust measurement, which anchors bra band sizing.
The circumference of the torso directly below the breast tissue, at the base of the ribcage. This measurement forms the basis of bra band sizing — the number in a bra size such as 12A or 14C - and is used alongside the bust measurement to estimate cup size.
The distance across the back from shoulder point to shoulder point. Shoulder width is one of the more diagnostically useful measurements in fit: it is the dimension most difficult to alter in tailored garments and the one most commonly out of step with standardised size labelling.
The circumference of each upper arm at its widest point. Captured bilaterally — left and right independently — to detect asymmetry. Sleeve fit in fitted tops and shirts is directly governed by this measurement. Bilateral difference flags are also used in the wellness profile's bilateral screening metric.
Torso
The circumference at the natural waist - the narrowest point of the torso, typically a few centimetres above the navel. This is the waist measurement used in skirt, trouser, and dress sizing, and is distinct from the waist measurements used in cardiometabolic risk assessment, which may be taken at a different anatomical reference point.
The circumference of the hip measured at roughly 7–8 cm below the natural waist, across the upper hip bone. This measurement is particularly relevant for the fit of fitted skirts and high-waisted trousers, where the fabric must pass over the hip bone before reaching the fullest part of the hip below.
The circumference at the fullest part of the hip and seat, typically 20–23 cm below the natural waist. This is the hip measurement used in standard garment sizing for skirts, trousers, and dresses. The ratio of waist to low hip is one of the key inputs for body shape classification.
The length from the crotch point to the natural waist, measured along the front of the body. Rise determines how a trouser or jean sits on the body — whether a given cut will land at the waist, hip, or lower — and is used in jeans sizing alongside the inseam length.
Lower Body
The circumference of each upper thigh, captured at its widest point near the crotch. Thigh circumference governs the fit of the upper leg in trousers and jeans - a dimension that standard sizing routinely fails to account for. Captured bilaterally to detect asymmetry.
The circumference of each calf at its widest point. Relevant for the fit of fitted trousers through the lower leg, and for boots and knee-high hosiery. Bilateral capture allows comparison between left and right, contributing to symmetry assessment in the wellness profile.
The length of the inner leg from the crotch to the ankle, captured independently for each leg. Inseam length is one of the two numerical dimensions in jeans sizing (e.g. 30×29 refers to waist circumference in inches and inseam length). Bilateral capture is used in leg-length asymmetry assessment.
Several measurements - bicep, thigh, calf, and inseam - are captured independently for the left and right sides of the body. Most people have some degree of natural asymmetry. Where the difference between sides exceeds established thresholds, this is noted in your wellness profile under bilateral screening. In the garment and fit context, bilateral measurements allow your profile to reflect the fuller side of your body in sizing recommendations.
Garment & fit
Your Garment & Fit section translates your measurements into the sizing language used by Australian clothing brands. Each output is calculated directly from your scan data. None of these figures are estimates based on how you present or how you describe yourself - they are derived from the geometry of your body.
A summary callout at the top of this section 'Your Fit at a Glance' gives you a plain-language reading of where your measurements sit across Australian size ranges, including guidance on where you are likely to sit between sizes and how that varies by garment type. Below that, seven specific fit metrics are displayed.

When your measurements fall between sizes
One of the most common questions founding members ask about their fit profile is why the size recommendation differs from the size they usually buy. It is a reasonable question, and the answer reveals something fundamental about how sizing actually works.
Published sizing charts assign a single hip measurement to each size number. But women's bodies do not distribute themselves neatly across those intervals. A hip measurement of 108 cm, for example, sits precisely between two sizes on a commonly used Australian sizing chart:
| Size | Hip (cm) | |
|---|---|---|
| AU 12 | 101 cm | |
| AU 14 | 106 cm | |
| 108 cm | ← your measurement | |
| AU 16 | 111 cm | |
| AU 18 | 117 cm |
A 108 cm hip sits 2 cm above the AU 14 chart entry and 3 cm below the AU 16. The chart does not accommodate this body. It never did.
To put that gap in concrete terms: a founding member with a 108 cm hip measurement - placed between AU 14 and AU 16 on the chart above - may typically wear a size 12. That is not an anomaly. It is a two-size span between what a sizing chart suggests and what actually fits, produced by a single measurement. The chart was never the whole picture.
A fit profile built from precise measurements will flag this gap honestly - recommending the size whose chart measurement is closest to yours, or noting the range. But the recommendation and the size you have always bought may be different numbers. That difference is not an error in your profile. It reflects two separate things that sizing charts were never designed to reconcile.
The first is that chart measurements and garment measurements are not the same. Clothing brands typically add ease, additional room beyond the body measurement, to allow for movement and comfort. A garment labelled AU 14 is not cut to 106 cm at the hip: it is cut larger, typically by several centimetres, depending on the fabric, the style, and the brand's fit philosophy. A woman with a 108 cm hip may find an AU 14 fits comfortably because the ease built into that garment covers the gap.
The second is that sizing charts are not consistently applied even within a single brand, let alone across the market. An AU 14 at one label is cut differently from an AU 14 at another. The number is a label, not a specification. Most women have already internalised this — shopping by feel rather than by number, trying multiple sizes, or defaulting to a size that worked once and hoping it will work again.
Your HeraVita fit profile gives you the underlying measurement — the geometry — rather than a size label. Knowing that your hip measures 108 cm means you can look at any brand's published size guide and understand immediately where you sit, how much ease their cut provides, and whether sizing up or down is the more informed choice for that particular garment.
e.g. Bottom hourglass, Top hourglass, Triangle, Inverted Triangle, Straight
Calculated from the proportional relationship between your bust, waist, and hip measurements. HeraVita uses a classification system that identifies the geometric relationship between these three anchor points — whether the upper and lower body are balanced, which is fuller, and how defined the waist is relative to both. Body shape is relevant to understanding which garment silhouettes are likely to work across the proportions of your body, and which may require adjustment.
e.g. 12A
Derived from the underbust and bust measurements. The band number (8, 10, 12, 14, 16, 18 etc.) corresponds to the underbust circumference translated to Australian bra sizing conventions. The cup letter is estimated from the difference between the bust and underbust measurements. Bra sizing varies between brands and fit is also influenced by breast tissue distribution, so this figure is an evidence-based starting point rather than a definitive size.
e.g. Medium
Derived from wrist circumference interpreted relative to height. The wrist is used as the primary frame indicator because it has minimal soft tissue overlay and largely reflects bone structure directly. A medium frame classification means your wrist measurement falls in the mid range for your height. Frame size is relevant to fit because two women with the same weight and height but different frame sizes will carry that weight differently across their bodies. It is also useful context for interpreting body composition reference ranges: at a given BMI, a small frame carries proportionally less mass than a large one.
e.g. AU 10
Calculated from bust, shoulder width, and upper body measurements mapped against Australian women's sizing conventions. Top size and bottom size frequently differ - this is normal, and is one of the more common ways that standardised sizing creates fit problems. Your profile separates them so each reflects the relevant measurements.
e.g. AU 12
Calculated from waist, high hip, low hip, and thigh measurements mapped against Australian women's sizing conventions. For many women, bottom size differs from top size. Where the difference is one size, standard garments may require minor adjustment; where the difference is two or more sizes, off-the-rack fit across the waist-to-hip proportion becomes structurally difficult without alteration.
e.g. AU 10–12
A combined estimate that accounts for the full body, weighted across bust, waist, and hip. Where top and bottom size differ, the dress size range reflects that span - it indicates which sizes a dress is most likely to require, and whether sizing up or down is likely to favour particular proportions. Structured dresses and stretch dresses behave differently across this range.
e.g. 30 × 29
Expressed as waist circumference × inseam length in inches, following the numerical convention used by most denim brands globally. The waist figure is derived from your narrowest waist measurement converted to inches. The inseam figure reflects your leg length. Where left and right inseam measurements differ, the longer measurement is used to ensure adequate length across both legs.
Your fit at a glance
The Fit at a Glance callout at the top of your Garment & Fit section is designed to give you the most practically useful summary of your sizing in plain language. Rather than stating a single size, it describes where your measurements sit relative to Australian size ranges - including whether you sit squarely within a size or between two sizes, and how that might translate differently across garment types.
The distinction matters. A woman whose measurements sit between an AU 10 and AU 12 is not a woman who can simply choose either. For tops - governed primarily by bust and shoulder - the AU 10 is likely to fit more cleanly. For fitted skirts, trousers, and dresses - governed primarily by hip and thigh - the AU 12 will give more room. For non-stretch fabrics, sizing to the larger measurement is generally the more comfortable choice. For stretch fabrics, the smaller size may still work.
This kind of nuance is exactly what is lost in a single-size label. The Fit at a Glance callout makes it explicit, so you can read a clothing label with more precision than the label itself provides.
Australian clothing brands do not share a standardised sizing system. An AU 12 at one label is not the same cut as an AU 12 at another. Your HeraVita fit profile gives you your actual body measurements, which means you can compare them directly against any brand's published size guide - most brands publish these, though they are not always easy to find.
HeraVita's garment sizing, when our own collection is produced, will be built from the measurement data collected through the Fit Study. Our size labels will correspond to real measurements, documented and published, so that any woman who knows her scan measurements can determine her HeraVita size without guessing.
Your body isn't a size
The closing callout in your Garment & Fit profile reads: Your body isn't a size. These recommendations are generated from your actual measurements. Because clothing brands use different sizing systems, your best fit may vary. HeraVita's mission is to help create garments based on real women's bodies - not inconsistent size labels.
This is the premise HeraVita was built on. Sizing systems were not designed to fit the full range of women's bodies - they were designed to simplify mass production. The result is that most women have spent years adapting to clothes rather than wearing clothes that fit. The split between top and bottom size, the shoulder that pulls, the waist that gaps - these are not personal shortcomings. They are the predictable outcome of a system that was never designed with individual bodies in mind.
The measurements in your profile are not a verdict on your body. They are geometry. Precise, objective, and useful - specifically because they are independent of how size labels are assigned. Knowing your measurements means you should be able to approach any brand's size guide, any tailor, any vintage piece, and any HeraVita garment from a position of actual information.
These recommendations are generated from your actual measurements. Because clothing brands use different sizing systems, your best fit may vary. HeraVita's mission is to help create garments based on real women's bodies - not inconsistent size labels.
Your scan profile is one part of a larger picture. If you haven't yet read about the wellness metrics derived from the same scan data - including body composition, bone health indicators, posture and structural measurements, and cardiometabolic risk markers - that article is available in the Journal: Understanding Your Wellness Metrics.
For the background on why HeraVita approaches garment-making this way, and why the Fit Study exists: The story behind HeraVita.
About garment and fit estimates. Garment and fit outputs in your HeraVita profile - including size estimates, bra size, body shape classification, and jeans sizing - are calculated from 3D optical body scan measurements and are provided as fit guidance only. They are not a guarantee of fit in any specific garment or brand. Clothing sizing varies significantly between brands, styles, fabrics, and cut. HeraVita makes no representation that any size estimate will translate directly to any particular garment. All size recommendations should be verified against the size guide of the specific brand or garment before purchase.
Your scan measurements are stored securely in your HeraVita account and are accessible only to you. For research and analysis purposes, data is used in de-identified and aggregated form. Profile illustrations shown in Journal articles are design examples only and do not represent any individual's results.
Leave a comment
Add a comment